How to Clean Earbuds Safely
Earbuds collect wax, dust, and moisture in tiny openings. A careful dry clean usually restores volume better than turning the sound up.
Dry Cleaning Routine
Remove silicone tips and wash only the tips if the manufacturer allows it.
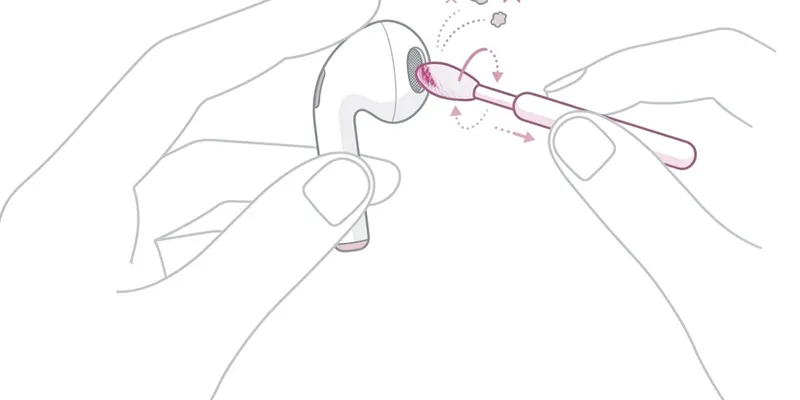
Brush the mesh gently while holding the earbud with the opening facing down.
Use a dry microfiber cloth on the charging contacts before returning earbuds to the case.
Sound Test
After cleaning, use the left-right sound test at low volume.
If one side remains quieter, repeat the dry brushing instead of using liquid.
Persistent imbalance can mean clogged mesh or battery/hardware wear.
What Not to Do
Do not soak earbuds, scrape the mesh with a pin, or use cleaner sprays near speaker openings.
Do not put damp earbuds back into a charging case because moisture can damage the contacts and battery area.
How Often Should You Clean Earbuds
A light cleaning every one to two weeks is ideal for daily users. Earwax production varies from person to person, but even modest buildup on the speaker mesh can reduce perceived volume by 20 to 40 percent because the mesh openings are fractions of a millimeter wide. A weekly wipe-down takes less than two minutes and prevents wax from hardening into a crust that is much harder to remove later.
If you use earbuds during workouts, clean them after every session. Sweat contains salts and oils that corrode metal contacts and break down silicone ear tips faster than dry use. Wipe the stem, charging contacts, and ear tip surface with a dry microfiber cloth immediately after exercising. Letting sweat dry on the earbuds accelerates the buildup of salt crystals inside the mesh.
Deep cleaning once a month is recommended even if the earbuds look clean externally. Remove the ear tips, inspect the mesh under bright light, and use a soft-bristle brush to dislodge any particles embedded in the mesh. If your earbuds came with a cleaning tool—as AirPods Pro 2 and Sony WF-1000XM5 do—use it instead of improvised tools like paper clips or sewing needles, which can puncture the mesh.
Replace silicone ear tips every three to six months if you notice they have become stiff, discolored, or no longer seal properly in your ear canal. A poor seal does not just reduce bass response—it forces you to increase volume to compensate, which accelerates driver wear and increases the risk of hearing damage over time.
AirPods Pro vs Standard AirPods Cleaning Differences
Standard AirPods (first, second, and third generation) have a fixed speaker mesh with no removable ear tip. The mesh sits flush with the earbud surface and accumulates wax directly on its face. Cleaning requires gentle brushing with a dry, soft-bristle brush—Apple recommends a clean, dry toothbrush with soft bristles. Avoid using any liquid directly on the mesh because standard AirPods have no silicone barrier between the mesh and the driver behind it.
AirPods Pro (first and second generation) add a removable silicone ear tip that covers the speaker mesh. Pull the tip straight off by gripping the base, not the silicone flange. The mesh underneath is finer and recessed compared to standard AirPods, which helps keep wax out but also makes cleaning trickier because debris can settle into the recessed lip. Use the pointed end of a dry interdental brush or the Apple-provided cleaning tool to reach the edges.
The AirPods Pro ear tips themselves can be rinsed under fresh water without soap. Apple explicitly supports this in their cleaning guide. After rinsing, shake out excess water and let the tips air-dry completely before reattaching. Never reattach wet tips to the earbuds because water can wick through the mesh and onto the balanced-armature driver inside.
Both models have charging contacts on the stem that must stay clean for reliable charging. A dry lint-free cloth works for light residue. For stubborn grime on the contacts, lightly dampen a cloth with isopropyl alcohol at 70 percent concentration and wipe only the metal contacts, avoiding the mesh and microphone openings. The AirPods Pro charging case also has a speaker on the bottom for Find My alerts—brush this grille occasionally to keep the chime audible.